Cortex Software: Built-in Database Engine
Cortex Software Built-In Database Engine
Cortex uses SQLite database engine - fast, reliable and
file based, which means, you don't have to mess with drivers.
You can use them through the UI, to keep data organized.
Or you can access databases from Cortex scripting language.
Note: for a complete list of available SQL
commands, see the documentation at
SQLite home page.
The tutorial below requires some basic knowleges of
SQL and relational databases, but it has nothing one
cannot learn in an hour or two by searching Google.
From the main menu, select File - Create / modify database.
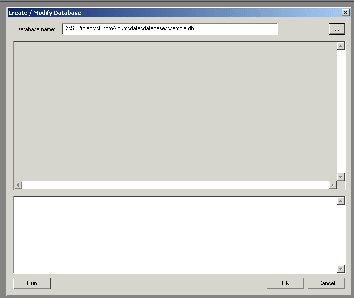
Click the "..." button, make sure you are in
"databases" folder (whereever you prefer to keep your
databases), type in the database file name
(in our example, it is "photo.db")
and click OK. The file photo.db is created.
Cortex uses a free-style database system, it does not
imply any limitations on tables and fields you use.
So the first thing we need to do is to decide what
information the database will contain, and what the
structure of a database should be.
For this example, we are going to create a simple
photo album. It will have information about location
of image files on disk, names of images, and more or
less detailed (multiline, perhaps) descriptions for
each image. It will also contain the location
information: Country, State and City, where a photo
was taken.
There are few ways of organizing the data, we will
use a relational approach. The location information
(Country, State, City) will be kept in the Places table,
while the image information will be kept in Images table.
First, let's create the Images table. In the bottom
window of the dialog, type the SQL statement (note
the semicolon at the end):
CREATE TABLE Images(ImageName TEXT,
ImageDescription TEXT, ImageLocation TEXT,
PlaceId INTEGER);
Click "Run", and the table will be created. The table
info will appear in the upper (non-editable) window:
type = table
name = Images
tbl_name = Images
rootpage = 2
sql = CREATE TABLE Images(ImageName TEXT,
	ImageDescription TEXT, ImageLocation TEXT,
	PlaceId INTEGER);
Note that the PlaceId field is used to refer to the
location information in the Places table. This is the
way relational databases work; using this approach we
can reduce the size of our database (by not typing
"USA, Utah, Salt Lake City" over and over again),
and to reduce errors (by not typing
"USA, Utah, Salt Lake City" in one place and
"USA, UT, Salt-Lake-City" in the other, which are
two totally different places from the point of
view of a database engine).
Creating Places table is a bit trickier, as it contains
a field with unique value: PlaceId. To enforce its
uniqueness, we make it INTEGER PRIMARY KEY
(AUTOINCREMENT is optional, but if we want to
make sure deleted values are not reused, we add this
parameter, too).
CREATE TABLE Places(
PlaceId INTEGER PRIMARY KEY AUTOINCREMENT, Country TEXT,
State TEXT, City TEXT);
Now we want to enforce uniqueness of each
Country-State-City combination. To do so, we create
an index, called PlaceIndex:
CREATE UNIQUE INDEX PlacesIndex ON
Places(Country,State,City);
The resulting database looks like:
type = table
name = Images
tbl_name = Images
rootpage = 2
sql = CREATE TABLE Images(ImageName TEXT,
	ImageDescription TEXT, ImageLocation TEXT,
	PlaceId INTEGER)
-------------
type = table
name = Places
tbl_name = Places
rootpage = 3
sql = CREATE TABLE Places(PlaceId INTEGER PRIMARY
	KEY AUTOINCREMENT, Country TEXT, State TEXT,
	City TEXT)
-------------
type = index
name = PlacesIndex
tbl_name = Places
rootpage = 5
sql = CREATE UNIQUE INDEX PlacesIndex ON
	Places(Country,State,City)
-------------
Note, this is only one of few possible ways
"to skin the cat". For example, you can keep
Country-State-City information in three different
cross-linked tables, or in the same table with
Images. You can (and probably should) add a field
with keywords, like "winter, sunsets, outdoors" so
that you can perform complex queries later, and so on.
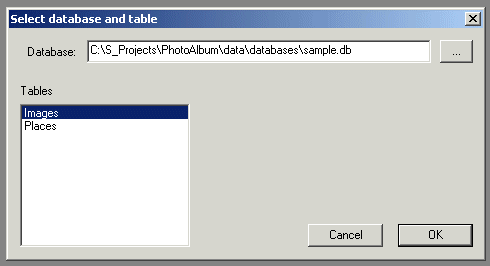
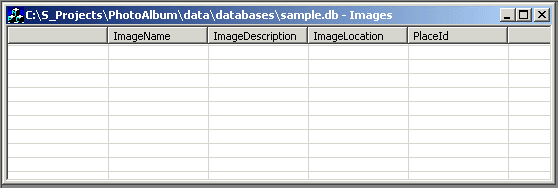
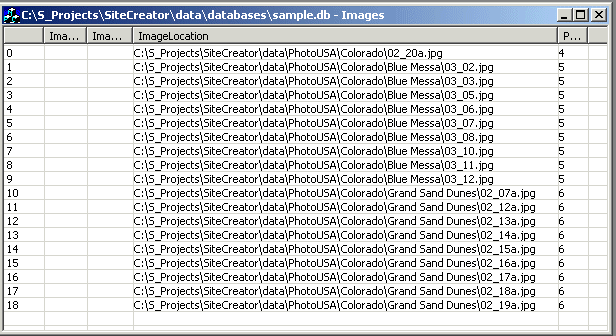
From the main menu, select File - Edit table records...
Select the database and a table you want to edit.
As expected, the table comes up empty:
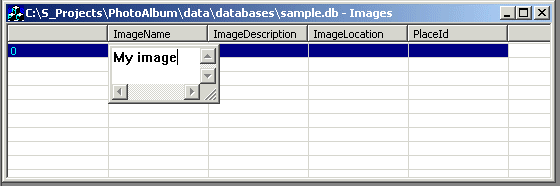
From the toolbar, click the "Insert" button.
A new empty record will be inserted to the table.
Double-click the field you want to edit (the leftmost
field contains the row number and cannot be edited:
it is not part of the table. Also you cannot edit
INTEGER UNIQUE fields, they are taken care of by
the system). The in-place editor will pop up:
To close the in-place editor, click outside its window,
or click "Save" button on the toolbar, or click
"Cancel" button.
The use of "Delete", "Edit", "Save" and "Save all"
buttons is the same you usually expect from Windows
applications, except they work without asking for a
confirmation.
As we are going to create a photo database, regardless
the fact, that it is just an example, lets do it
right. Images (photos) may contain so called meta data,
like title, keywords or (C) information. We are
going to extract it from image files we have and to
store them in our database. Once again, this is
just an example, skip it, it you do not care about
image meta information.
Before we import meta data, we need to have something
to import from. By metadata, we mean keywords,
author information, image size, camera settings and
so on. This information is, or at least, it can be,
part of the image, and modern image processing
programs, like Photoshop, allow you to edit it.
Also, some of these fields are filled by the
digital cameras (camera settings, image size,
sometimes even GPS position...)
Let's say, we have a directory (with or without
subdirectories), containing our collection of images.
We have entered there (to the images, using Photoshop
or similar software) keywords, and some other important
information, and we do not want to retype it
"by hand" while filling our database. Here
are the steps to automate this task.
First of all, let's use a freeware, and, probably,
the most sophisticated metadata extracting program,
exiftool.
If, by some reason, that link to a (third-party, we do
not control it) software becomes invalid, you can always
find it in Google, using "exiftool" keyword.
The exiftool comes with detailed manual, also, some
details you can find in
DigitalSell tutorial. For now, let's use
its command line version for Windows, that produces a
file, containing a) file name b) title and
c) keywords (the first is the name of an image,
and the second and third are values of the
corresponding fields, that are extracted from that image):
C:\exiftool\exiftool.exe -p
"$directory\$filename --- $Title --- $Keywords"
-m -r -s -ext .jpg -ext .tif C:\photo >
C:\exiftool\exiftool.txt
Just keep in mind, that the command line above is wrapped
by your browser, when you type it in a Windows command
prompt (Start-Run-"cmd"), it should be a single line.
All information, extracted from all files in
C:\photo directory will be written into the
"exiftool.txt" file:
C:\photo\Canada\BC\BC_001.tif --- BC trip --- ocean, sky
C:\photo\Canada\BC\BC_002.tif --- BC trip --- ocean, sky
...
Note, that I used " --- " as a field separator, you can,
to some extent, change it, of course.
Now, that we have the information to import, we need to
select a Cortex database table to import into.
From the main menu, select File - Edit table records...
That will bring up the table you want to edit.
After the table is opened, from the main menu, select
Edit - Import data...
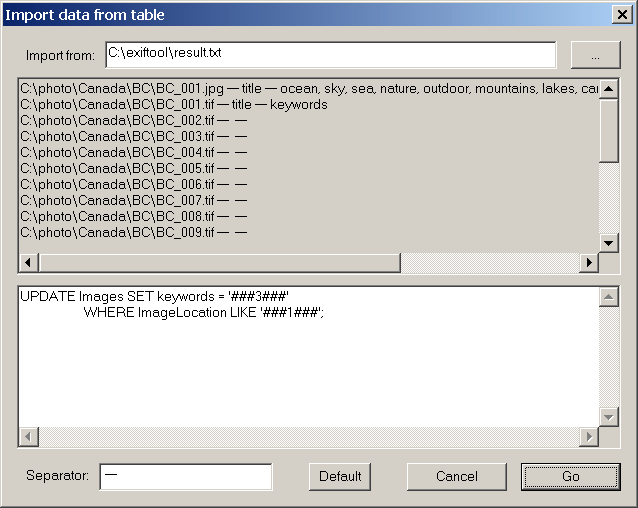
The "import from" field allows you to select a file
to import from, then, just below it, you will see a
small fragment of this file, allowing you to see its
structure.
Then, below this read-only "preview" field, you can see
the SQL editor. The tool allows you to specify
placeholders, containing field numbers. In the image
above, the ###1### is the placeholder for the first
field of the "import from" file, which is the image
file name. The ###3### is a placeholder for the 3rd
field, which is "keywords".
Note the "WHERE" part of the SQL. The SiteBuilder
program will read records from "import from" file
sequentially, then it will replace placeholders in
the SQL with field values, and then it will run
SQL against the database. The "WHERE"
part is used to decide, which record to update.
Also note the "separator" field. It is used to parse the
"import from" records into separate fields.
In the previous chapter, you learned how to import data
from a text file to the table's field. However, sometimes
these fields already have some data. Obviously, sometimes
you don't want to overwrite them, but would prefer
adding new data to existing ones. For example, if the
field contains keywords "ocean, sea", and you are importing
keywords "nature", the statement above will give you
just "nature" as the field's value, while "ocean, sea"
will be lost.
SQL allows to join strings by using something like this:
UPDATE Images
	SET keywords = keywords || ',' || '###3###'
	WHERE ImageLocation LIKE '###1###';
However, here is a problem: sometimes both the field and
a new data we want to import, contain the same keyword
(we are using keywords as an example here, as this is
one of the most frequent uses of this feature).
Let's say we have a field, containing "ocean, sea",
and we want to import "ocean, nature" in it. As the result,
we will get a duplication: "ocean, sea, ocean, nature".
To remove duplicates (assuming the field contains comma
separated keywords):
From the Main menu, select Edit - Compact fields...
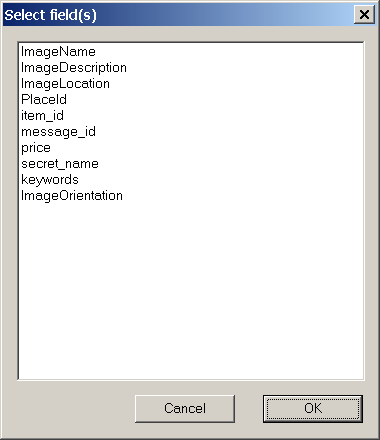
Select fields you want to "compact" (remove duplicated
keywords within the field) and click OK.
By exporting meta data, we mean taking the information from
Cortex's database (perhaps, after we edited it), and
writing it back to the corresponding images.
Cortex does not have a menu option for this
operation, and it can only be performed using scripting
language.
The idea is to generate a command (.BAT) file,
that is calling exiftool for every image we want.
Then we run this command file (by double-clicking it in the
Explorer, or from Windows command prompt), and it does
the rest of the job.
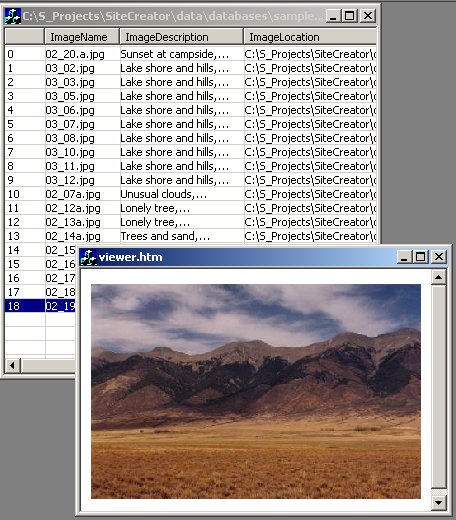
Viewer can be used to preview image files, stored in the
database. It can be accessed from View - Show Viewer (Hide
Viever to exit the mode), and when activated, will show the
preview of a specified field of a table every time you change
the current selection.
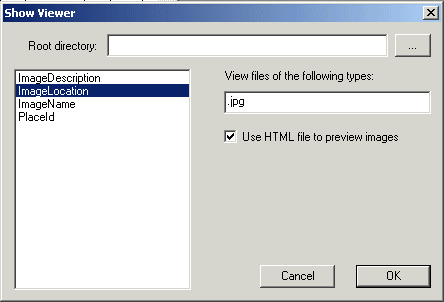
The field selected should, of course, contain a valid path to
the image. As the path can be partial (USA\Colorado\image_01.jpg
instead of c:\Photo\USA\Colorado\image_01.jpg), we can optionally
provide a path prefix (for the example above, c:\Photo).
As the field may point to files of different types, including
ones you cannot preview, or ones that are too slow to preview
(Word documents as an example), you can provide a
semicolon-separated list of file extentions, to filter out
files you don't want to preview.
Also, in case of large images, you will only see upper-left
corner of it, as the rest wouldn't fit on screen. To solve
this problem, you can specify the viewer.htm file, one that
handles scaling (included in the archive).
As the result, you will be able to see images as you scroll
through them:
To get fully enabled version of the Cortex, you need
to
register.
Visibility is very important
for this site. If you like it please link to
this URL.
|